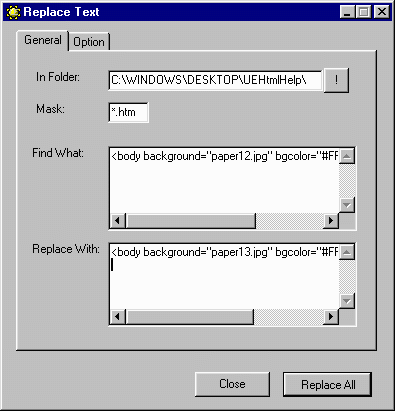
Replace Text
The Replace Text function allows you to replace a single word or entire blocks of text in a single file or every file on a drive/directory.

This feature can be launched via the main screen Tools - Replace Text menu option. This is an extremely useful tool for replacing words or entire blocks of text throughout multiple files within a drive or folder/subfolders.
Using the Text Block windows - it is fairly easy to replace very specific words or sentences or blocks of text in files that may contain similar - but not exact instances. You can narrow the specific replacements by what is contained before and after the target string.
Find What: This is where you enter the EXACT target string you wish to find in the file(s). In the example above, the target to replace is actually "http://softwaresolutions.net/forms/ordernow.htm". However, my HTML files may contain many instances of that URL that I DO NOT wish to replace. I can narrow it down to exactly which instances to replace by including the line contained above the target instance. In this case, "<H1>Secure Order Form</H1>". Using this parameter, the only instances of "http://softwaresolutions.net/forms/ordernow.htm" that would be replaced would be the ones directly below "<H1>Secure Order Form</H1>". All other instances of the target URL would be ignored.
You can use Copy and Paste across multiple Viewer windows to make sure you are entering EXACTLY the proper text (including spaces, tabs, etc). Simply open a target file in a Text Viewer window (if you have chosen the HTML Viewer as the default viewer for HTML files - you would then use the View Source button on the HTML Viewer to launch the source code into a Source Code Viewer window. Once in a Source Code Viewer window, you can highlight the necessary amount of text as the target string - use the Ctrl+C keys to copy (or the right-click - Copy function) - then switch to the Replace Text window and place your cursor in the Find What box and use the Ctrl+V key (or the right-click - Paste function) to paste that exact text into both the Find What and the Replace With windows (assuming you are only going to replace a portion of the target string).
In Folder: Once your have either pasted or typed in both the Find and Replace text - you must choose what drive, folder or subfolder(s) are the targets for this function. Use the "!" button to select this. Checking the Recurse subfolders option will include all subfolders under the selected folder in the Find and Replace.
Mask: Since this function works on almost any type of file - it is wise to use the Mask option to limit the Find and Replace to specific file types. For example, you may have a mixture of .htm, .txt, .cgi files in the target Drive/Folder/Subfolders - but you wish to Find and Replace only on the .htm files. You would then use the wildcard of "*" and .htm to designate all .htm files.
Options: Several options are available to refine and safeguard this feature.
Match Case: By default, the Find What target will be matched by either upper or lower instances - Secure, SECURE or SEcUre will be considered a match for "Secure" entered into the Find What box. Checking the Match Case Option insures that the Find What targets match EXACTLY what you have designated in that box.
Match whole word only: If the only word present in the Find What box is "Hot" - this would be matched by any instance of those letters in the target files such as "Hot", "HotBot", "Hotly" and the like - in which case if your Replace With was "Warm" - your target files would end up with words such as "Warm", WarmBot", "Warmly". You can avoid this by checking this option. This option usually is not necessary if using entire sentences or blocks of text in the Find What box because they will be unique within themselves.
Confirm Save: After the Replace All button is clicked, each designated target file will be quickly opened in a Text Viewer window and you will see the actual Find What strings being replaced by the Replace With strings. If the Confirm Save box is checked, you will be presented with the Confirm Save File dialog after each file is modified. The next file will not be modified until you respond to this dialog box. But it is useful if you want to manually scan the edited file to make sure the proper changes were made before saving.
Make Backups: Checking this option will make backup files of the original, unedited files with a .bk extension before saving the modified version as the original file name. For example, if the Find and Replace modifies 12 files in a directory - the originaly 12 files (before modification) will be saved in the same directory with the added .bk extension. This can be useful is doing complex Replacments and you want backups of the original files in case of error.