|
ClikView offers a very full range
of Archive tools giving you the ability to create, edit, view, extract, convert
compressed archive files using multiple formats - ace, arc, arj, bh, cab, gz,
jar, lha, lzh, rar, tar, z, zip, zoo. You can even create a
self-extracting Windows executable file (*.exe) from an Archive.
Archive
Manager | Add File dialog | Making .Exe
file | UUEncode | Archive Converter
Archive
Manager

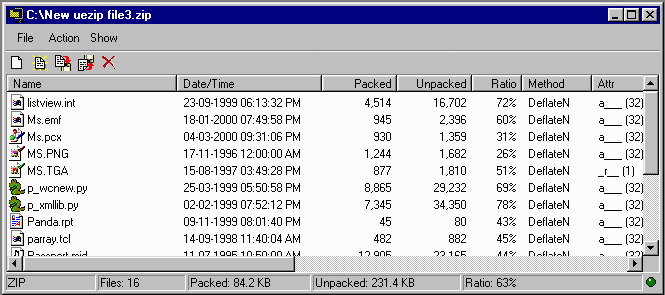
Archive Manager can be used to
open existing archives, create or edit existing ones and provides access to most
other archive features. The following menu commands are available:
File:
New Archive - Used to create new archives. Once clicked, the Open/Save
file dialog box will appear allowing you to choose the directory and file name
for the new archive. After that, the Open/Save file dialog box will reappear
allowing you to select the base files or folders to add to the new archive. You
may edit this list in the Add File dialog that will appear after this and is
better described under the Add File section.
Open Archive - Displays the Open/Save file dialog so you may locate the
archive you wish to open. ClikView supports many archive file format (ace, arc,
arj, bh, cab, jar, lha, rar, tar, zip, etc.). Once selected, all the files
within the archive will be displayed in the main Archive Manager window. You
may use the Preview menu to select large or small icons, list view or details
view.
Convert Archive - Will launch the Convert Archive dialog allowing you to
convert an archive into a different compressed format such as bh, cab, gz, jar,
lzh, tar and zip.
UUEncode - Allows you to UUEncode or XXEncode archives. This is used when
your Email client does not offer such conversions automatically on attachments
(most later version Email clients do). See below for details.
Filter Archive - Allows you to view only specified file types that may be
in the archive. Nothing will be changed within the original archive unless you
Save or Save As after setting a filter.
Close - Will close Archive Manger
Action:
Add - Will launch the Open/Save file dialog box allowing you to add
additional files/folders to the open archive via the Add Files dialog box as
described in that section below.
Delete - Will delete selected files from the archive.
Extract - Allows you to actually extract all compressed files into a
designated drive/directory.
View - You may use the View option to launch any selected file within an
archive into the associated application.
Select All - Will select all files within the archive.
Select None - Will unselected any and all selected files.
Invert Selection - Will reverse the current selected/unselected choices.
Make .exe - Will create a self-extracting Window's Executable (*.exe)
file from the open archive. The .exe file will be created in the same directory
where the open archive resides. See the Making .Exe files section below
for more details.
Check integrity - Will extract the archive into RAM and check the
integrity of each file and display the results in an Output window.
Refresh - Will refresh the file list view.
Show:
Preview - Checked by default, this will launch every selected file within
an open archive into its associated ClikView Viewing/Editing window.
Blank Directories - Toggle to show or not to show empty directories that
may exist within the open archive.
Elasped Time - Will display the elasped time on any action such as
extracting, compressing or converting archives.
Last Output - Will display the Output window with the contents of the
last output you performed.
Large, Small, List, Details - Controls how the list of files in an open
archive are displayed.
Many of the above options are
available via a right-click menu when you are in the main Archive Manager
screen.
Add Files -
Creating New or Editing Archives
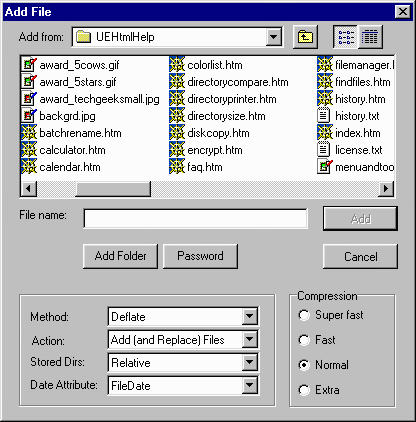
The Add File dialog box appears
after the Open/Save file dialog box when ever you create a new archive or wish
to edit an existing one. If you choose a file or folder in the Open/Save
file dialog box, that file or files (including directory structure) will appear
in the Add File display area. You can add additional files or folders by using
the Add Folders and/or the Add Files buttons to use the basic procedure to add
additional items which will also appear in the file list display area.

CREATING A NEW ARCHIVE:
Use the File - New Archive menu item in Archive Manager. This will launch the
above allowing you to select the files you desire to include into the new
archive. You may remove undesired files by selecting them and using either the
Remove Selected or Remove All options in the right-click menu.
Once you have all the desired
files included, you may select your other options and create the new archive.
Method:
Deflate - This will compress the files into their smallest file size
according to your selection under the Compression area.
Store - This will simply store all the files into an archive without
compressing them.
Action:
Add (and Replace) Files - This will Add new files to archive or Replace
existing files.
Move Files - This will actually Move the selected files from their
current location into the archive.
Stored Dirs:
None - Regardless of where the files come from (Drive/Directory) - no
file path data will be stored in the archive. Therefore, all files will be
extracted in a single user defined directory when extracted.
Absolute - Will store absolute file paths for the compressed files. This
could cause a problem if such paths include Drives that do not exist on
another machine which the archive is extracted to.
AbsoluteNoDrv - This will store multiple directory file paths but not
Drive letters. It can be used to create multiple new diretories on the user
defined drive when extracted.
Relative - This will only store directory/folder path that are relative
to each other such as subdirectories. This is useful for creating archive when
the subdirectory data is necessary such as an archive of a website where all the
graphics are contained in a /images subdirectory under the root directory that
contains the HTML files. The files in the root directly will not contain any
directory/path information - only the subdirectories under the root will contain
this data.
RelativeStoreStart - Same as above except even the files in the root
directory will contain the root directory name.
Date Attribute:
FileDate - This will maintain the original date of each file in the
archive.
SystemDate - This will change the file date of every file in the archive
to the current system date of your system.
MaxFileDate - This will use the latest (the newest file date) as the date
for all files in the archive.
Compression:
The Super fast, Fast, Normal and
Extra settings control the amount of time it takes to compress all the files
into an archive (and somewhat how long it will take to extract them). This
setting also controls the amount of compression put on each file. The
faster the speed - the less compression.
Password:
If desired, you may password
protect your archive so that it may not be extracted without the proper
password.
EDITING EXISTING ARCHIVES:
When in the Archive Manager, you
may delete files directly as described previously. However, if you wish to add
files or folders to the open archive, you would use the Action - Add menu item
which would launch the Open/Save dialog box and then the Add File dialog as
described above.
Any files/folders you add to the
Add File dialog will be added to the open archive and the entire archive will be
recreated using the other settings as described above.
Making
.EXE files
This great utility will take the
open archive and create a self-extracting Windows Executable (.exe) file. This
file can be distributed and extracted on any other Windows computer even if such
machines do not have any type of Zip/Unzip utility program.
To use this utility you must have
an existing archive open in Archive Manager. You can activate this feature
through the Action - Make .Exe menu item or the right-click menu while in
Archive Manager.
By default, the .exe file will
have the same root file name as the archive file and be saved into the same
directory. Once created, the archived files can be extracted simply by executing
the created *.exe file.
Using
UUEncode
UUEncode/XXEncode can be used if
you intend to send archives via the Internet as Email attachments and your Email
program does not provide automatic encoding of attachments. Most later versions
of all popular Email programs do automatically encode (either MIME or Base64)
attachments so it would not be necessary to use the Archive Manager UUEncode
feature.
To encode an archive, first you
must select the desired archive by using the "!" button next to the Read
File input line. You may also choose the Write File path
if the default path is not the desired path.
Encode Method: This
feature supports both the UUencode and XXencode methods. UUencode is selected by
default.
Please Note:
Encoding may not be done properly if filename contains spaces. For
example encoding "New uezip file.zip" will produce "New uezip
file.xxe" or "New uezip file.uue". However you may have a problem
decoding. But encoding of "New_uezip_file.zip" or "NewUeZipfile.zip"
works fine. You may change the desired Write File name to meet the above
requirements in the Write File input line.
Max kbytes per file:
Used to specify the maximum file size of the encoded file. If the encoded size
exceeds Max KBytesPerFile, subsequent volume(s) are created each time the volume
reaches the size of KBytesPerVolume. If KByesPerVolume equals 0 (default) then
the encoded file is not split into multiple volumes.
Write decode table to
file-header: If checked, decode table will be inserted to the file
header. This table contains a series of ASCII characteristics generated during
encoding process. (It is an optional setting. Nothing happens if this setting is
unchecked.)
Decoding an UUencoded or XXencoded
file: If using ClikView, you single click on a *.uue or *.xxe file in File
Manager, the Archive window will auto-launch and display the message
"Decode archinve to temp folder and open it." Clicking yes will decode
the file and display files in the Archive Manager window. At that point you may
use any of the Archive Manager features on the decoded files.
Archive
Converter
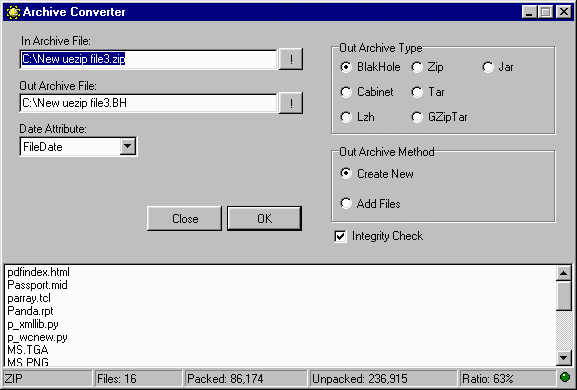
The Archive Converter can be
reached through the File - Convert Archive menu item in Archive Manager. In
essence, this utility will convert an archive of one type into another. For
instance, it allows you to convert a .zip archive into a .tar archive.

In Archive File -
If you have an archive open in Archive Manager and select the Convert Archive
options - the open archive will automatically be selected as the In Archive File
- or the file to be converted. You may use the "!" button to launch
the Open/Save dialog box to choose any other archive file on your system.
Out Archive File
- This is where you designate the path and file name for the new converted file.
Again, you may use the "!" button to select this path/name.
Out Archive Type
- This selects the file type for the newly converted file. The Out Archive File
extension will be automatically matched to the file type selected.
Out Archive Method
- The default is Create New which will create a new file while leaving the
original file intact. The Add files option is used to add the files of an
existing archive into an already existing archive of a different type.
Date Attribute -
Dictates what File date will be applied to the files when they are converted.
Integrity Check -
Will double check each file after the conversion to insure there was no
corruption.
Awards:


|


